Pages

Popular Posts

Search This Blog

Monday 29 November 2010

Diver Welter Site TA2

I have already posted on the remains of the concrete bases for huts for this HAA battery. However following my last visit to TNA I have found some additional information on the site. It formed part of the Diver Strip, but was not a standard HAA site but known as a 'Welter Site'. The 'TA' series of Welter sites had two 3.7" HAA guns and 11 Bofors 40mm LAA guns. 


Above: Location of Welter Site TA2

For Diver sites, radar could sweep an area with an arc of 30-110 deg. and had a range of up to 30,000 yards. The range that HAA sites could engage targets was 5,000 yards, for Welter sites it was 3,500 yards. Targets picked up on radar would be selected if they were likely to pass through the circle which would put them in range of the guns.

Although I am aware that the layout of most  Diver HAA sites was with the four guns arranged in a straight line, I have not yet found any details on the layout of Welter sites (if anyone has any details I would love to hear from you).


Above: Layout of a Diver Site (based on aerial photo) with guns arranged in a line with accommodation huts, stores, workshops etc nearby.

Last weekend I made a return visit to the site, mainly to map the remaining traces of the anti-landing trenches nearby. These have been in-filled and remain only as depressions. I also came across some large pits/depressions which possibly could be the remains of some of the gun positions.


Above:
Image 1: GPS plan of remains in area of Welter Site TA2.
Image 2: Aerial photo of camp, 1945.
Image 3: One of four depressions, perhaps remains of gun positions?

Following this I had a walk in the area and found another site with a substantial number of practice slit and crawl trenches. so all in all a very productive day!


Above: Remains of weapons-slit, Westleton Heath

Sunday 21 November 2010

Anti-landing trenches, Westleton Walks

Spent a pleasant Monday last week mapping the anti-landing trenches at Westleton Walks. These trenches are unusual compared to those I've mapped to date. Although laid out in the grid pattern, they have been dug in two forms:

  • the usual form I've seen, with spoil in heaps a little back from the trench
  • the spoil placed as a 'lip' to the trench


Above: Google sketchup representations of anti-landing ditches. Top is typical with soil in heaps set back from the trench. Bottom shows the spoil placed in 'lips' - the first time I've come across this.


In one stretch of  trench, it changes from spoil in heaps to a lip mid way. In another stretch, the lip is only one one side for part of the trench, with a much shallower depth of  trench along this section.


Above: GPS map of anti-landing trenches, Westleton Walks

I have an aerial photo of these trenches taken in 1946 (not sure of copyright so cannot post it) and it clearly shows the ditches in this form at least at the end of the War. My only thoughts so far to explain the above is that possibly the usual form (spoil in heaps) was dug by excavator while the spoil in lips sections dug by hand. Maybe the short section with a lip on only one side was never completed (or possibly part in-filled from one side post War?).

The aerial photo also sadly  shows that these are only partial remains of the anti-landing obstacles. I did come across shallow depressions which I thought at the time may be in-filled ditches - will have to go back at some point and map these and over lay them on the aerial photo to be sure.

After mapping the ditches, a little explore revealed a typical 6'x2' slit trench and 6'x4' weapons-pit along with a few bits of angle iron and the remains of a 4" mortar round. Also many circular depressions, probably shell holes. The aerial photo also shows what appear to be shell holes. These are the first positive remains I've found for training in this particular area of Westleton Walks to date.

Below:
Image 1: Anti-landing ditch with spoil placed in 'lips'
Image 2: Anti-landing trench with spoil placed in mounds
Image 3: Section of trench which changes from spoil in 'lips' to spoil in mounds mid way along its length
Image 4: Section of anti-landing trench with two bits of angle iron nearby
Image 5: Remains of 4" mortar round


Tuesday 16 November 2010

54th Div - Demonstration of Obstacle Crossings Sudbourne (Nov 1942) - Part 4


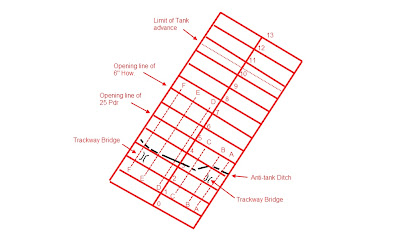
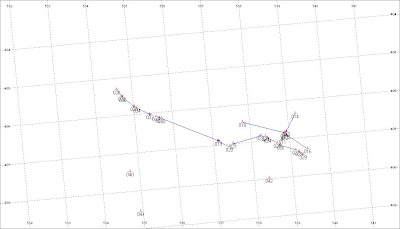
For this post, reference is again needed to the above barrage trace.  I have added the anti-tank ditch to the trace which I recorded by GPS on the site visit. Note that there are a number of breaks in the ditch – could these be the remains of crossings created by this demonstration?

With reference to the barrage map the line AA marks where the ditch was crossed by fascine, line BB a crossing was created by an explosive charge, line CC crossing was by a scissors bridge and line DD, EE and FF crossing was by digging ramps by hand. On the lines DD, EE and FF the second minefield was crossed with the aid of ‘snakes’. Lanes were to be made through the second belt of wire with Bangalore Torpedoes.

The third part of this blog looked at the first phase of the demonstration (barrage and creating lanes through first minefield and belt of wire). The second phase of the demonstration was the crossing of the ditch and second bet of wire and minefield. At zero hour two squadrons of tanks of Royal Armoured Corps were to set off and ditch charges and Bangalore Torpedoes detonated. Tanks were then to advance to their objective and take a hull down position to support the infantry attack on the final objective.   At zero plus nine the infantry were to set off.

Methods of crossing ditch:

Fascines: These were basically bundles of small diameter wood. Fascines were traditionally used for strengthening earth works, revetting river banks etc but were used since at least Roman times for crossing obstacles. Tanks carried them for this purpose in the First War and the practice was continued in the Second war. I have come across one specification of fascines made from chestnut paling rolled around 2” tubular scaffolding.


Scissor bridge: a bridge that was transported and laid by a tank (either a Covenanter or Cruiser Mark V). The carrier tank could then disengage from the bridge allowing other vehicles to cross. The bridge could span a gap of 30 feet and carry a tracked load of up to 30 tons.


Click on the following link to see a scissor bridge in action during training somewhere in the UK in 1941:
http://www.britishpathe.com/record.php?id=78720
Its an exercise showing a river crossing but clearly shows how the bridge would have worked.

Method of clearing lanes through second wire obstacle:

Bangalore Torpedo: these had also been around since the First War. It was basically a prepared charge used for breaching wire obstacles. It consisted of a steel tube of 1.5 inches diameter which was filled with high explosive. It came in six foot sections which could be connected up. A bullet shaped nose was fitted to the lead section to ease the passage of the tube over the ground. It was basically then just pushed under wire obstacles and blown by a detonating cord. The photo show US troops training in the UK with Bangalore Torpedoes.


Method of clearing lanes through second minefield:

Snakes: basically similar to Bangalore Torpedoes  except they were put in place by tanks and used for clearing lanes through minefields. Snakes could be up to 400 feet in length, contained 800 lbs of explosive and could clear a gap 30 foot wide.

Unfortunately the one thing lacking from the War Diaries on this demonstration is a report on the outcome and conclusions drawn from the exercise***. Well that’s it on this demonstration for now although I may well return to it in future as I still want to explore the site further for any other remains of training in this area.

References for this series of blogs came from:

54th Div, 163rd Brigade and 7th Borders papers, TNA
Lonesentry.com
Thinkdefence.co.uk
Wikipedia
Field Engineering and Mine Warfare, pamphlet No 3, Demolitions Part 1, 1953 – WO
Tactical handling of Tanks in co-operation with Infantry, 1949, (Provisional) - WO
Skylighters Blog

*** Now found in another document but will be placed on main website under new Training tab

Friday 12 November 2010

54th Div - Demonstration of Obstacle Crossings Sudbourne (Nov 1942) - Part 3


The above image shows the barrage trace for the exercise. The fire plan was for 25 pdrs and 6” Howitzers to open fire at zero on the opening line for 2 minutes. Is was then to lift at 200 yards per minute. A 'trace' would be issued to the various artillery units taking part and would have simply been placed over a map.


The above shows an example of a trace with two 'lanes' for batteries.

Smoke cover was to be provided by 3” mortars.

Although this exercise was not about artillery training it does provide an example of how barrages were orgainized. Barrages were of two types:

·         The wheel method – this ensures that infantry or tanks  are brought onto the objective by the barrage. The disadvantage is that troops/tanks have to move at different paces. In the illustration below,  lifts are at 100 yards per minute along the greatest distance (line BF), the lift will be less than 100 yards on line AE


·         The Echelon method – in each lane the lifts are equal so the pace of advance of troops/tanks is also equal. The disadvantage of this method is that infantry/tanks are not brought onto the objective at the same time.


The barrage in the exercise is an echelon barrage with two lanes.

The start of the demonstration was to take the following form:

·         Royal Engineer parties to prepare bridges over the drainage ditch

·         Royal Engineer parties to move forward and cut and mark six lanes through the first belt of wire 12 feet wide.

·         Lanes to be cleared and marked through first minefield by  prodding (three lanes, each lane18 feet wide) and use of polish mine detector (three lanes, each lane 18 feet wide).

This was to be completed in 35 minutes – and following this was to be the crossing of the anti-tank ditch and second minefield. This will be the subject of the next and final post of this exercise.


Above: Polish mine detector (in use in by 8th Army -IWM). Development of this detector was started in Poland pre War but was interrupted by the outbreak of War. A final design was completed by Jozef Kosacki in late 1941 and 'gifted' to the British Army (Source: Wickipedia).

Sunday 7 November 2010

54th Div - Demonstration of Obstacle Crossings, Sudbourne (Nov 1942) - Part 2,

This post will look at the scenario of the demonstration and the site as it exists today. The War Diaries note that the site for the demonstration was chosen in order to provide a good view point for spectators of the demonstration rather than ground which would be suitable from a tactical point if it was for real.

The scenario for the attack was that enemy forces had been driven off 'Grandstand Ridge' and had fallen back to prepared positions on 'Forest Ridge' where they were holding defended localities. 163rd Brigade had forward posts established on 'Grandstand Ridge' and for the purpose of the demonstration, 198th Infantry Brigade was to attack through 163rd Brigade and capture 'Forest Ridge' with a view to driving the enemy out of Tunstall Forest.

The demonstration was to take the form of:
  • Royal Engineers to prepare crossings over drainage ditch and marking and clearing lanes through the first minefield.
  • Royal Engineers to prepare crossings over anti-tank ditch.
  • Tanks then to cross start line (with one tank carrying fascine for crossing anti-tank ditch), pass through lanes and use 'snakes' for clearing second minefield. To overwhelm forward enemy posts then occupy hull down positions to cover infantry advance to final objective.
  • Infantry to follow tanks and capture 'Forest Ridge'.
  • A barrage was to be laid down to cover Royal Engineers in their work in preparing crossings over obstacle and to support the tanks to the second minefield.
Although the demonstration was carried out in daylight, it was assumed that the work in clearing the first minefield and preparing crossings over the anti-tank ditch took place during the darkness of early morning, troops taking part being issued with dark glasses. The actual 'attack' went in at 'dawn' (actually 1215 pm for the demonstration).

It is worth quoting the following from Military Training Pamphlet 'Tactical handling of Tanks in co-operation with Infantry' - Provisional 1949:

'The first essential in any deliberate attack will almost always be the breaching of those obstacles, natural or artificial, which form part of the enemy defences. To effect this, breaching teams, composed normally of assault engineers and specialized armoured troops, must be detailed, as well as the necessary arms to provide protection by supporting fire and smoke whilst the actual operation is being carried out'. The above demonstration clearly illustrates this statement and in fact it could equally apply to tactics developed by the end of the First War.

The pamphlet also notes that the infantry momentum must be kept up and the assault on the final objective would be aided by the fire support of tanks.

Next post on this demonstration will look in more detail at barrages, fascines, Bangalore Torpedoes  and snakes.


Troops taking part in the exercise included:
One squadron 156 R.A.C
One squadron 157 R.A.C
19 Field Regt
Three Troops 168 Field Regt
75 Med Regt
One section 598 Field Company
One battalion 198 Inf Brigade (7th Borders)

Image 1: Sketch of demonstration site with start line 'Grandstand Ridge' and objective 'Forest Ridge' added. An enclosure was erected on 'Grandstand Ridge' for spectators to view the demonstration. The circled numbers are the positions from which the following images were taken:
(1) Image taken from 'Grandstand Ridge' looking over the demonstration site towards 'Forest Ridge'.
(2) Image taken from the slope leading up to 'Forest Ridge' looking back towards 'Grandstand Ridge'.
(3) Image taken from anti-tank ditch, looking towards 'Forest Ridge'
(4) Part of the 'imaginary' battle field, looking from an enemy defended locality over Fazeboons towards 'Grandstand' Ridge. Briefings for the demonstration were held at Fazeboons.
(5) The drainage ditch


Monday 1 November 2010

54th Div - Demonstration of Obstacle Crossings, Sudbourne (Nov 1942) - Part 1

Although the individual War Diaries of Home Forces contain frequent reference to training exercises and demonstrations, it's rare that a full record exists. Mostly it's just the aims of the exercise. The records of one exercise that I've already mentioned (Exercise Kruschen) contain aims of the exercise as well as a detailed summary of findings but sadly the maps are missing. The records that remain of the exercise which is the subject of this blog contain aims and a good map (including the 'echelon' barrage trace - more on this on a later blog). The area on which the demonstration took place has changed little from 1942 (a bit more forest cover) and is  freely accessible so it makes a good study. I think that this exercise should be viewed in conjunction with Kruschen (and later exercises held by 79th Armoured Division - the beginning of planning for 'D' Day and dealing with German defences which troops would have to face).
The aim of the demonstration was to show some of the methods  to deal with obstacles that would face troops in battle. The demonstration was supposed to show an attack on a brigade front but difficulties in getting enough tanks and ammunition shortages limited the demonstration to a one battalion front, with  'imaginary' troops and obstacles on the flanks.

The obstacles to be tackled were:

  • belt of wire with successive entanglements
  • minefield, 60 yards deep consisting of 10 rows of Mk IV anti-tank mines at 7 yds spacing
  • existing drainage ditch
  • anti-tank ditch, 'V' shaped and 15 ft wide and 9 ft deep
  • second belt of wire
  • second minefield, 110 yards deep consisting of 12 rows of Mk IV anti-tank mines at 12 yds spacing
These obstacles were prepared by 591 Field Company. In addition an enclosure was constructed for those to attend the demonstration.  Perhaps the importance of this exercise can be judged from the fact that a second anti-tank ditch was constructed (to the north of the demonstration site) for troops taking part to practise on.


Last Sunday I visited the site. The anti-tank ditch still exists, (along with some anti-landing trenches) and good views can be had of the 'battlefield'.  In future blogs I hope to concentrate on individual details of the demonstration as well as some photos of the site today.

Image 1: Sketch of demonstration site (with barrage trace)
Image 2: Sketch imposed on Google Earth
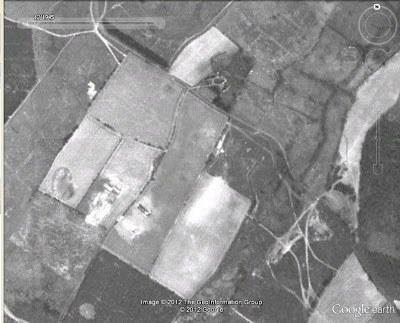
Image 3: Aerial photo of site in 1945. Tracks / disturbed ground clearly show the level of armoured fighting vehicle training in the area although most is probably related to training by 79th Armoured Division from 1943 onwards.
Image 4: GPS of remains found to date - the anti-tank ditch (and a section of anti-landing trenches)